


How to set up a Webflow Project
Definition
What you’ll get in this lesson
In this lesson you’ll learn how to set up all the necessary project files and necessary settings for website projects in Webflow. We primarily use Figma and Webflow to create our websites, and therefore will be focusing on how to set up a Figma File and matching Webflow Site.
What is a Webflow Project?
A webflow project is a website or web application that you create and manage using Webflow, which is a cloud-based software as a service for building and hosting.
What app or tools are used?
Webflow, Figma, Relume, Batch Styler
Who is it for?
Anyone who wants to build a website without using code. Especially to designers and those with minimal coding knowledge.
Webflow developers and website designers will benefit most from this.
Why is it important?
How to set up a webflow project is quite important for several key reasons, especially for users or organizations that want a high-quality, customizable website without experience coding knowledge. Some reasons are:
- Standardize the way we build
- Design and develop at super speed!
- Understand the defaults we like to work with
- Easier site management
- Know where to find assets and settings in Figma and Webflow
- Better performance
Steps
To set up a webflow project we need two things.
- The first one is knowing how to set up your Relume Figma file.
- The second one is how to set up a Relume Webflow project.
How to set up your Relume Figma file:
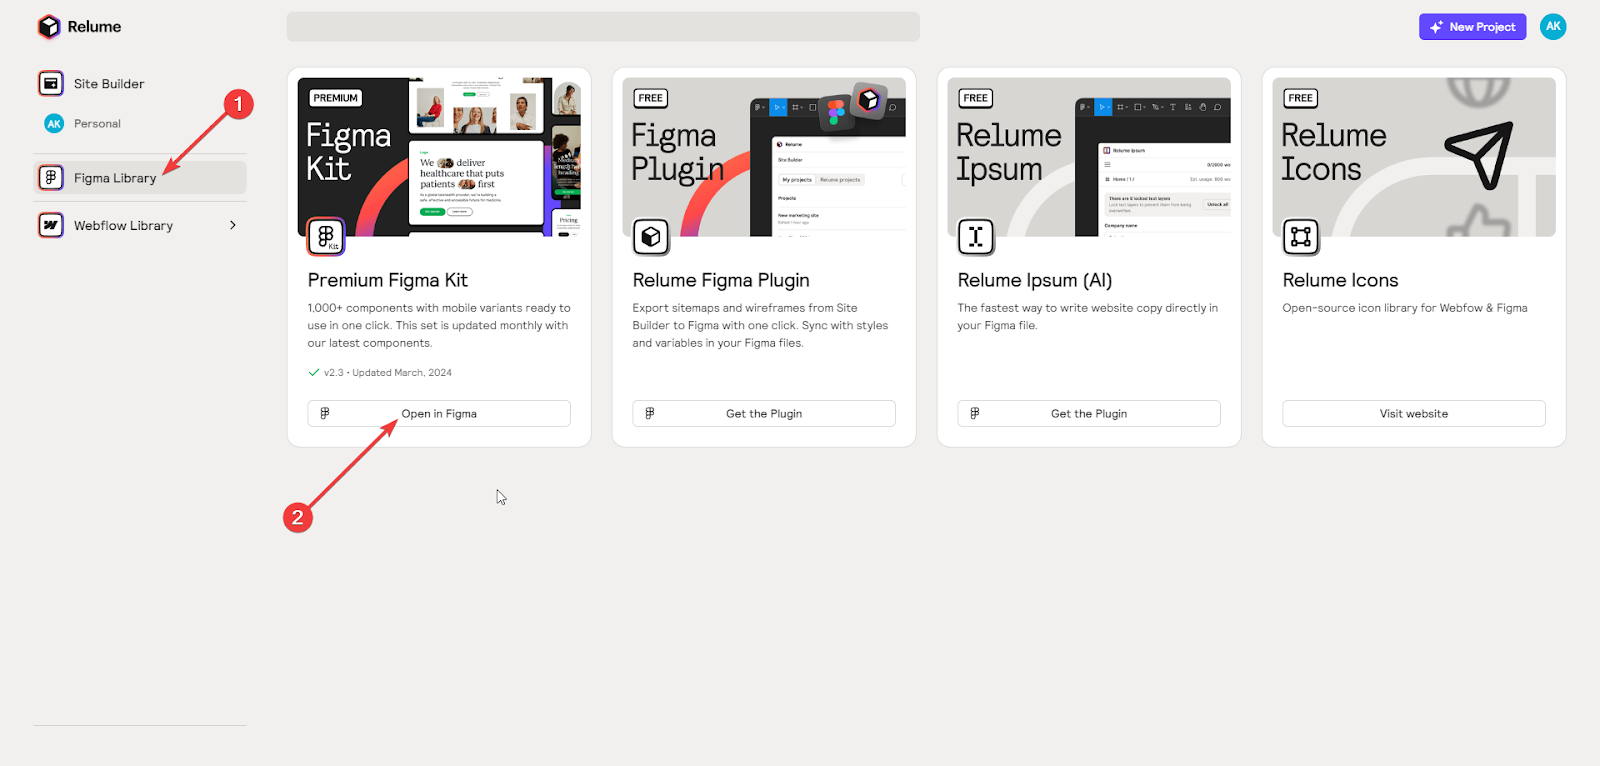
- Go to library.relume.io (make sure to login)
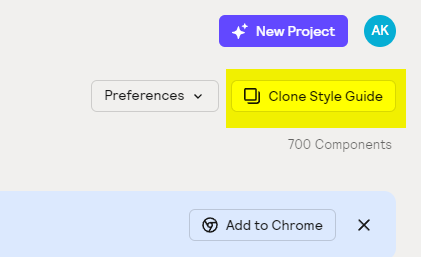
- Go to Figma Library(1) > Premium Figma Kit > click on "Open in Figma”(2)
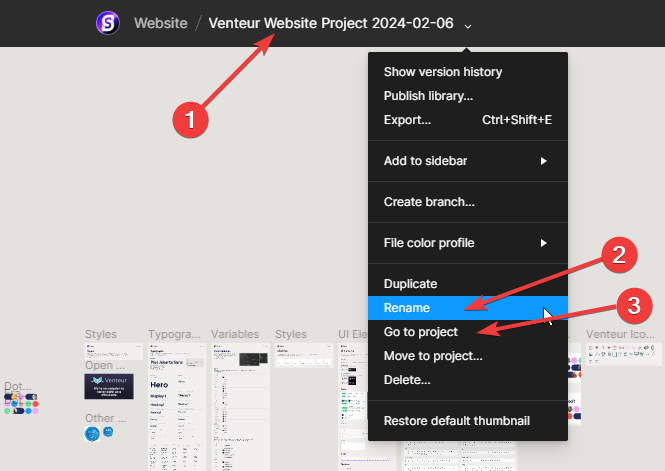
- Inside Figma, change the name of the project, using our naming convention:
[Client Name] [Project Name] - YYYY-MM-DD (1)
- Move the project to an existing folder or create a new one
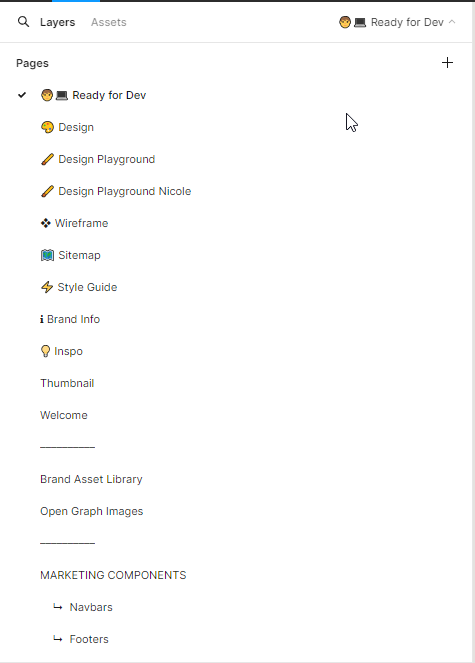
- On the left side panel create the following pages:
- Ready for dev
- Design
- Design Playground
- Inspo
- Wireframe
- Sitemap
- Style Guide
- Brand info
- Thumbnail
- Welcome
- Brand Asset Library
- Open Graph Images
- Or skip step 5 by duplicating the kinship template:
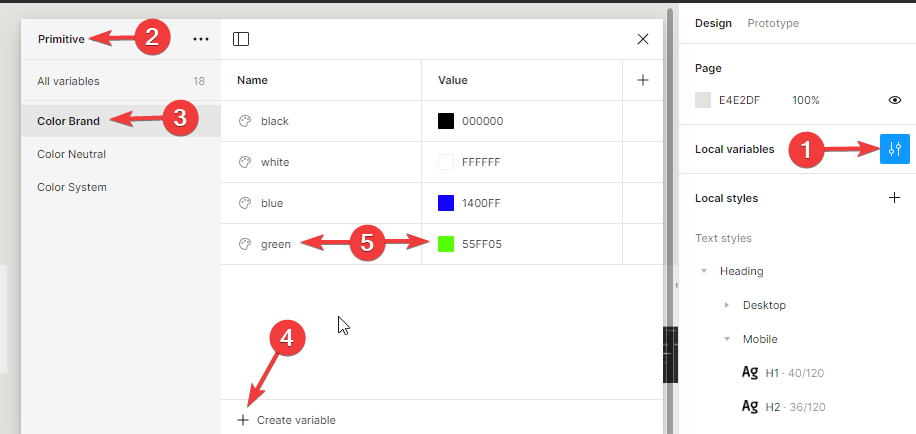
Creating Local Variables:
- While not selecting anything, in the right panel click on Local Variables > “Open variables”
- Choose between Primitive and Semantic colors
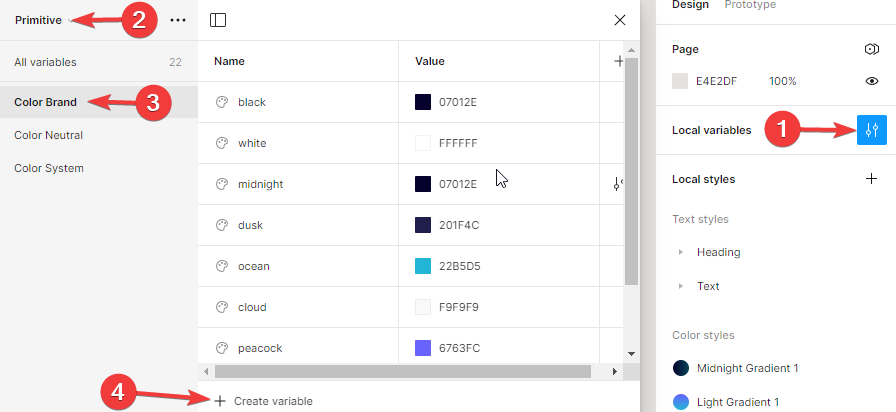
- Color Brand > Create variable > color > rename color > choose color > HEX code

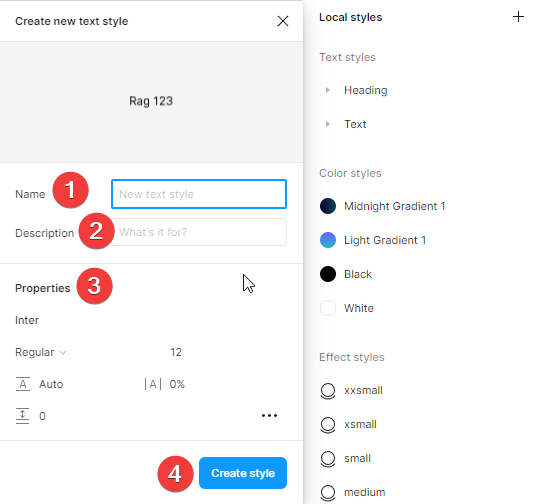
Creating Local Styles:
1. Go to the right panel > Local Styles > choose between text, color, effect, grid
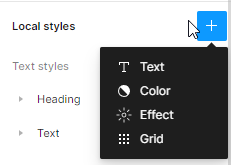
2. Create a name, a description, choose properties and create style
Style Guide:
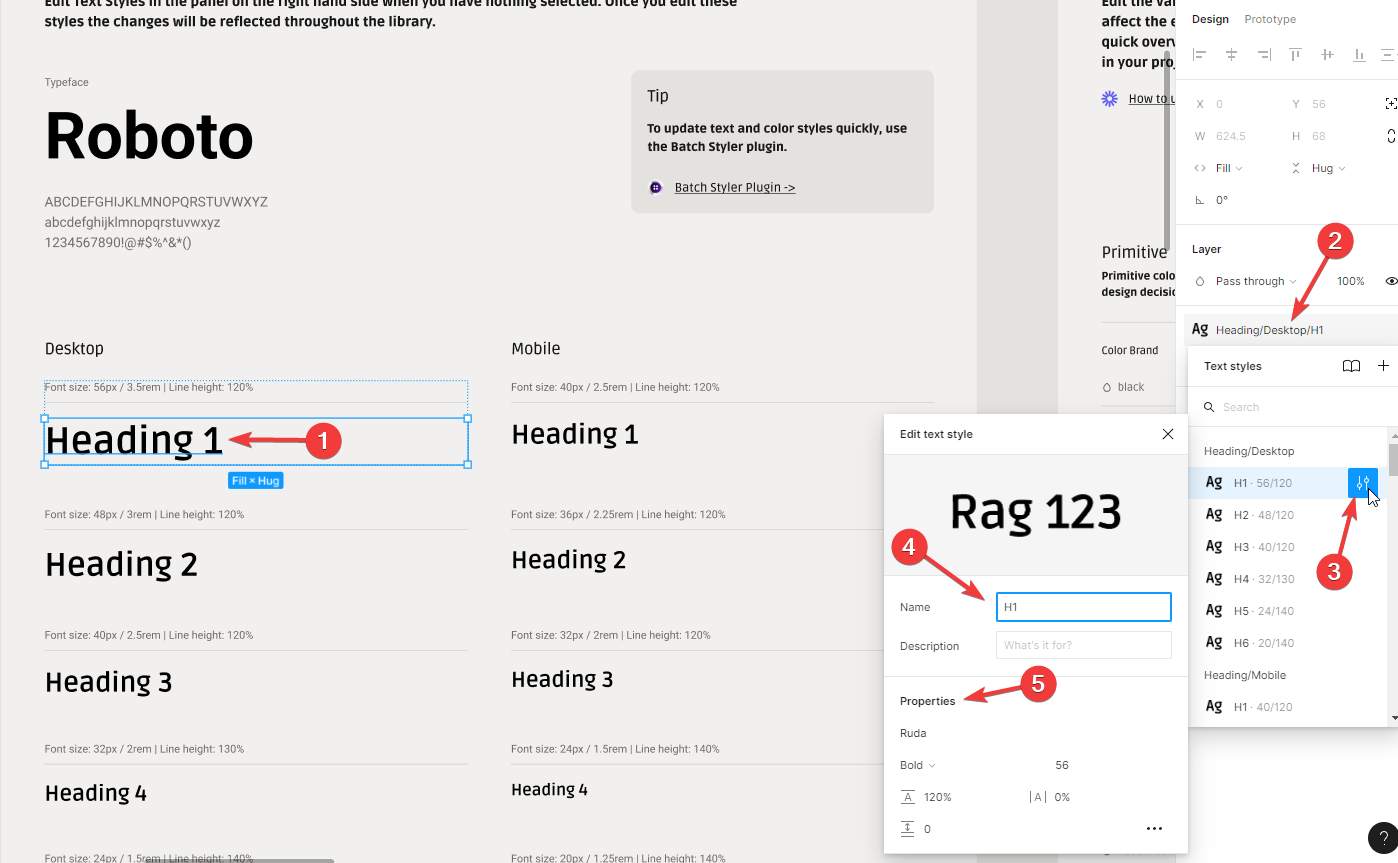
6. Typography
- While selecting one of the text style, in the right panel click on the edit style button
- Edit text style > name, description, properties
- Go through each text style and edit one by one
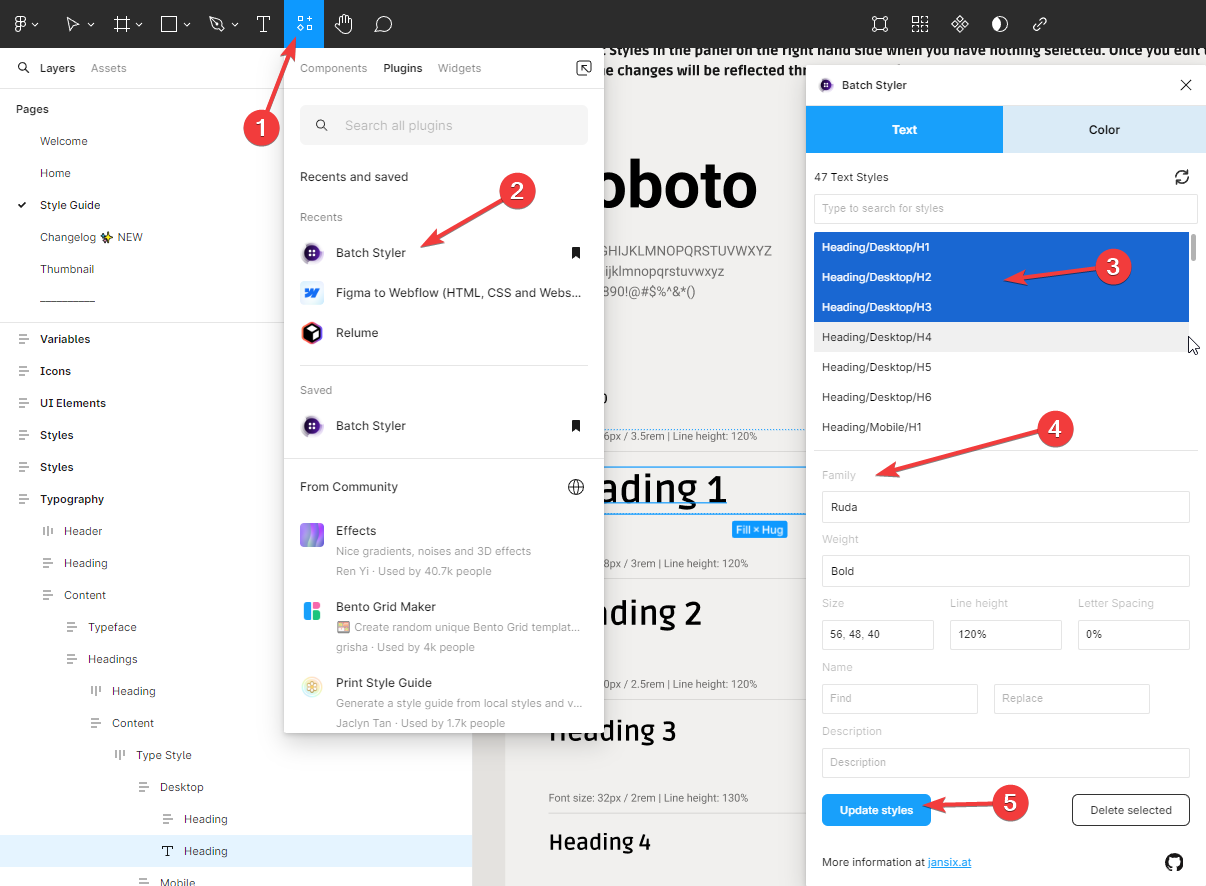
6.1 To update text style quickly use the Batch Styler plugin:
- Click on Batch Styler Plugin
- “Open in” > Choose the file >run the batch styler
- Choose the text style you want to change, or choose many by ctrl click on them > search for the family font, weight, etc > update styles
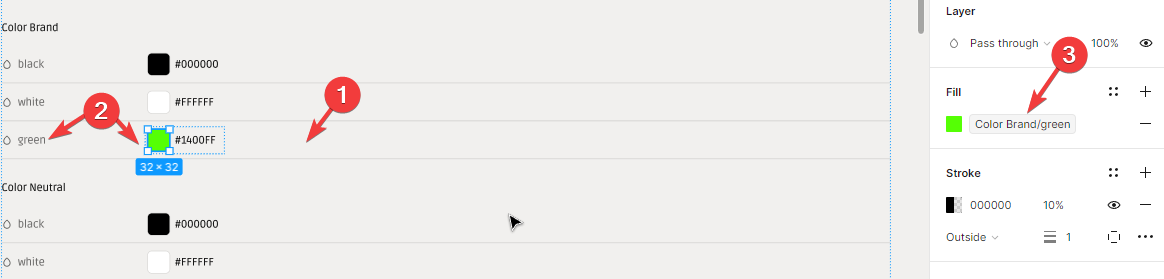
6.2 Colors Variables
- Go to Local Variables
- Click on Primitive or Semantic to create a color variable.
- Edit your color variable
- Go back to the style guide. Copy and paste a variable row.
- Replace the name, the color by detaching the color brand/white on the right panel (or any other color you have copied) and the HEX code to your corresponding color.
- Repeat process for differents colors
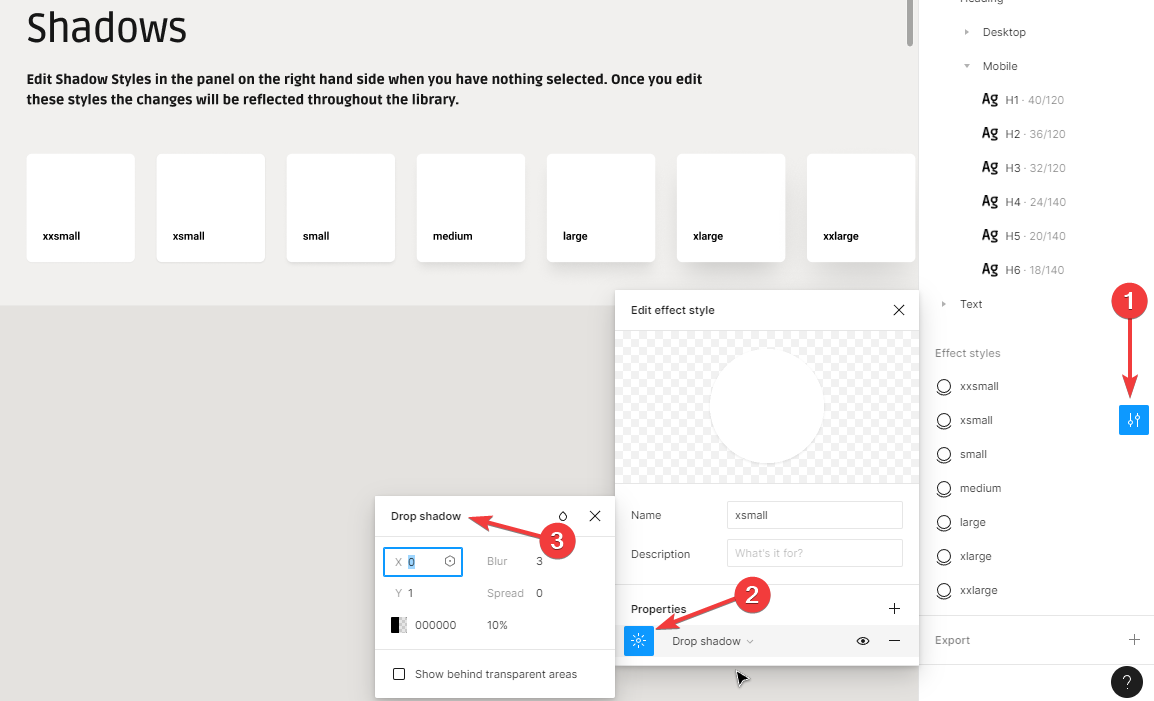
6.3 Shadows
- On the right side panel go to effect styles
- Select any effect you want to change >click on edit
- Edit Name and Description if needed
- In properties click on effect setting
- Change the drop shadow X, Y, Blur,Spread and Color
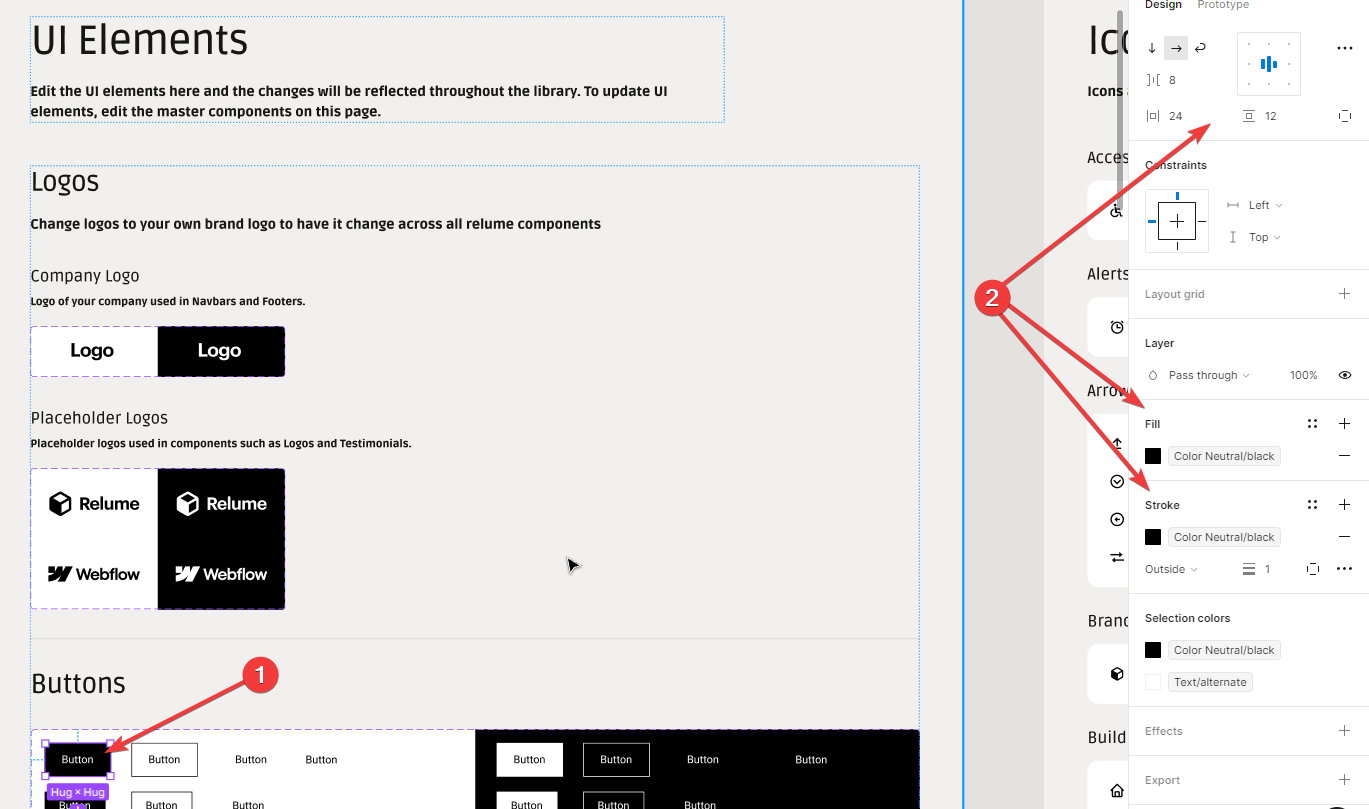
6.4 UI Elements
- Change your own brand logos
- Customize buttons > In the right panel you can add corner radius, border color, background color, size, etc
- In Inputs > change border radius and others styles
6.5 Icons
- In this panel you can add the project icons
How to set up your Relume Webflow project:
1. Go to library.relume.io (make sure you’re logged in)
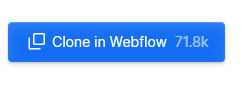
2. Click on Webflow Library > clone style guide > clone in webflow > create a site
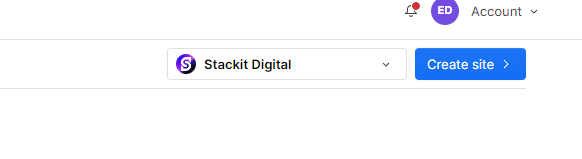
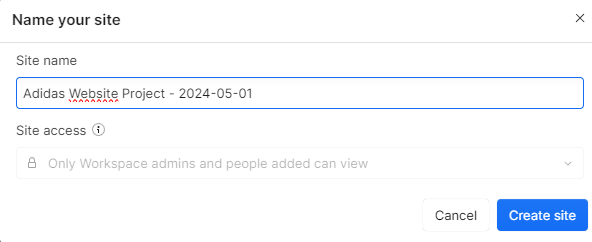
3. Name your site and put it into the proper folder
- Naming your site should look like this: [Client Name] [Project Name] - YYYY-MM-DD
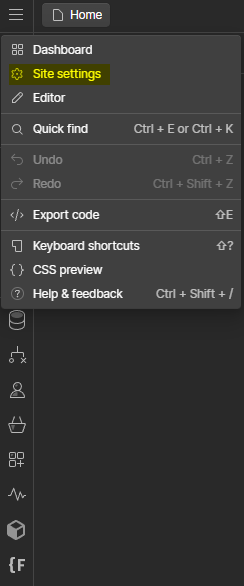
4. Set up your Webflow Site Setting:
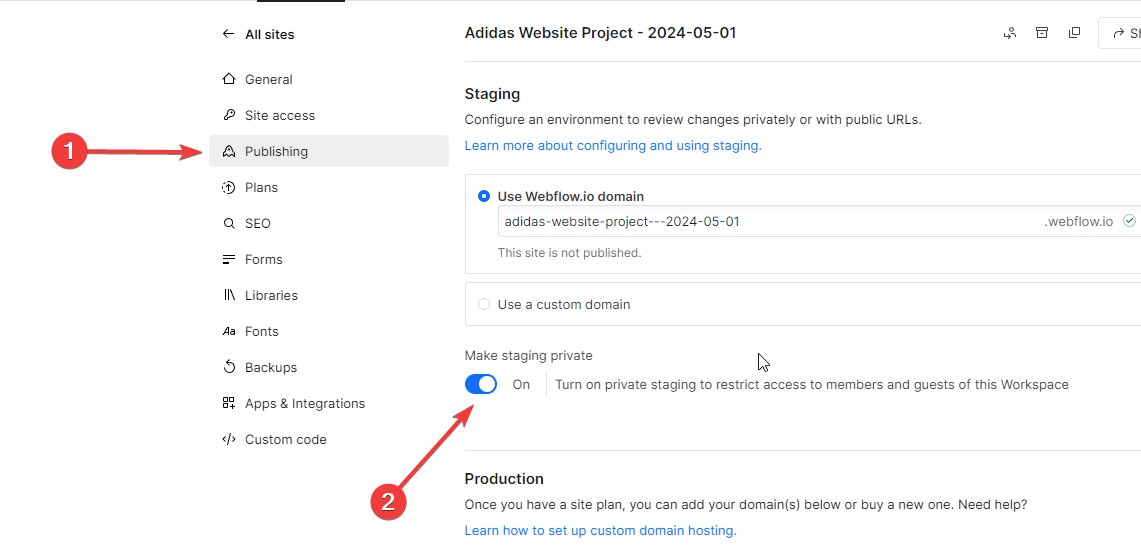
- Staging domain: some text
- Publishing > make sure to make staging private
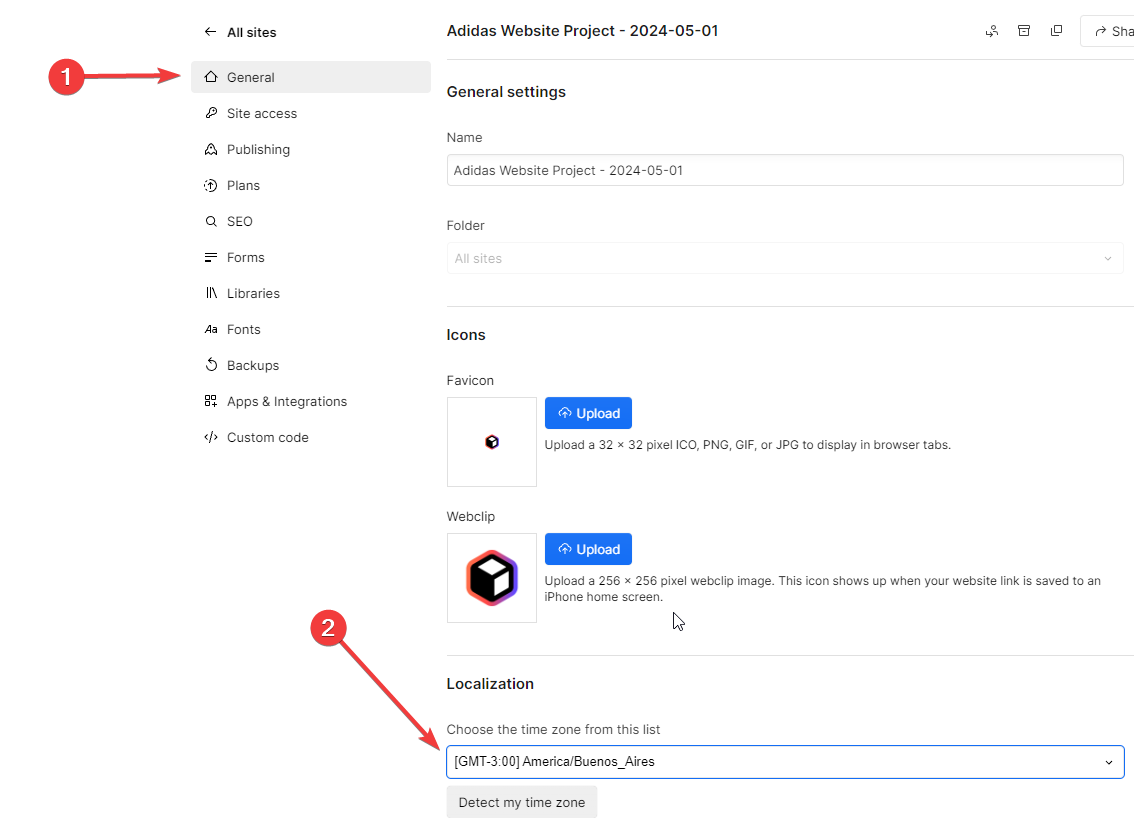
- Location:some text
- In General Settings choose your time zone from the list and save it
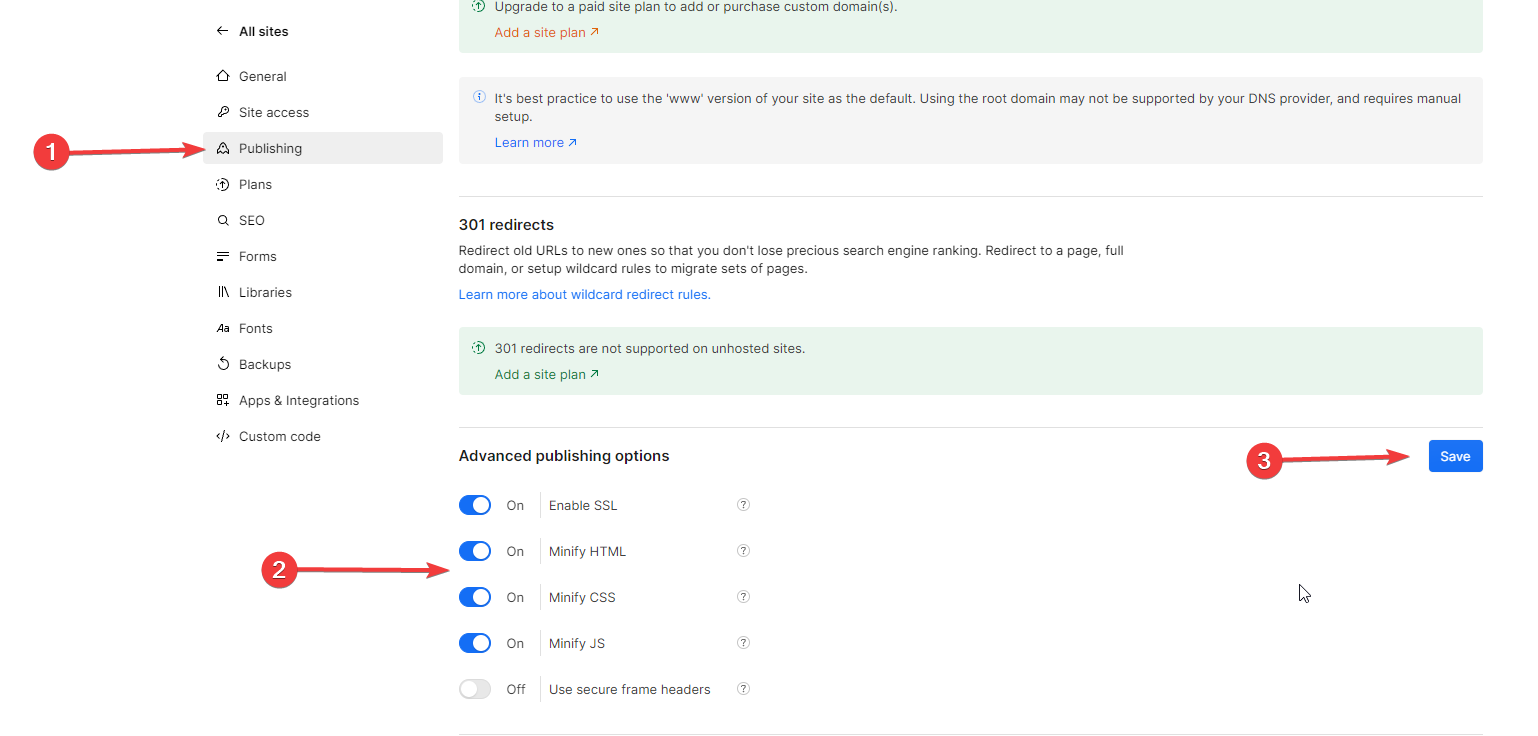
- Miniaturize code:some text
- Go to Publishing and in Advanced publishing options turn on Minify HTML, CSS and JS
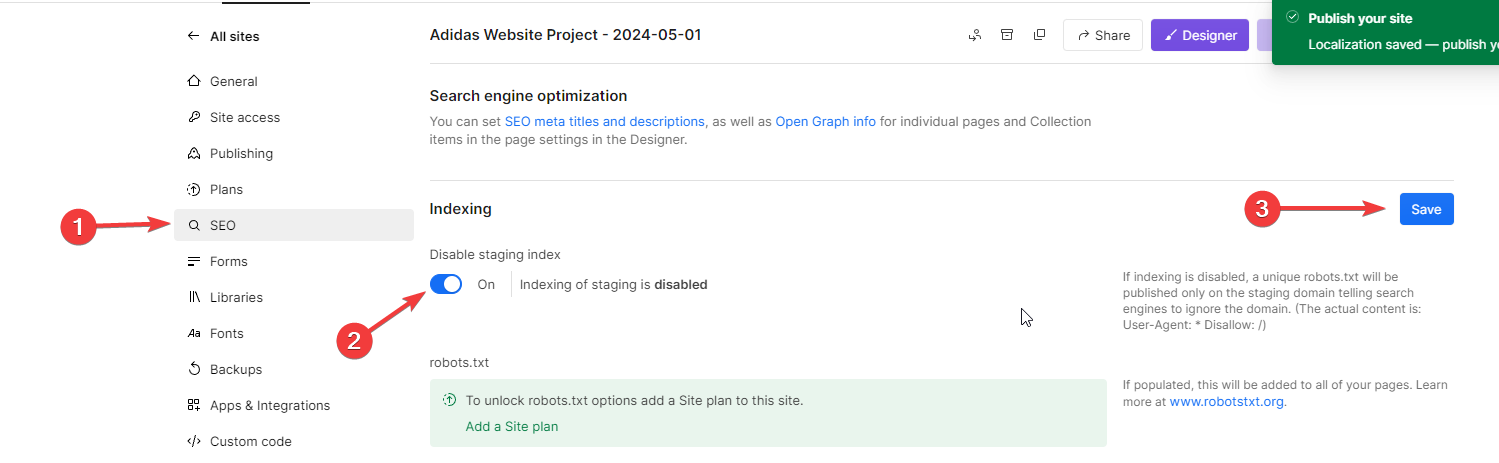
- Indexing: some text
- In the SEO panel, enable staging index and save
- Import and set up your fonts:some text
- Site Settings > Fonts
- NOTE: IMPORTANT: please use variable fonts whenever possible. We prefer .woff2 files in our projects and it is preferable to upload a .woff2 variable font to installing a Google Font if available. You may also need to upload fonts instead of using Google Fonts for companies that need to be GDPR compliant.
- To learn more about adding fonts please visit the following help articles:some text
- How to add Google Fonts to your Webflow project
- How to add custom fonts to your Webflow project
- Best practices for using fonts and font files in websites
- Choose a font from the list or Custom it by uploading a font > Select the variants

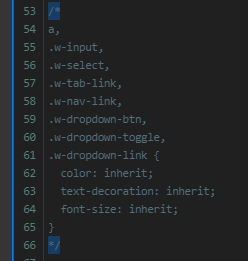
7. Global Styles: In the Navigator double click on Global Styles > go to settings on the right panel > open the code editor.

8. Make sure to erase "/*" and "*/" to uncomment the piece of code so it applies to the HTML Embed Code.
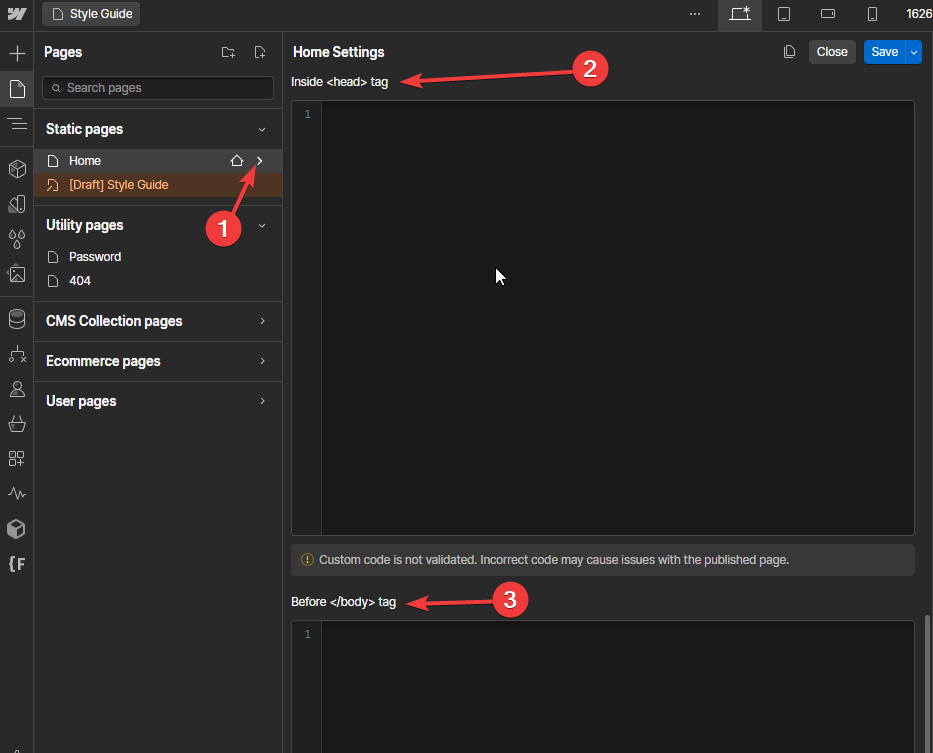
9. To add custom code go to Home Page > click on settings >Scroll down and you ́ll find the <head> and the <body> tag to write your custom code > Save it
10. On the left panel go to the Relume icon (it looks like a cube, see screenshot below) > Class Sync > Sync Mode should be toggled to “On”

Structure:
The Core structure of any project uses Client First. It has to look like this:
- Bodysome text
- Page-wrappersome text
- Global Styles
- Main-wrappersome text
- Sectionsome text
- Padding-globalsome text
- Container-largesome text
- Padding-section medium
- Container-largesome text
- Padding-globalsome text
- Sectionsome text
- Page-wrappersome text

Creating a component:
- Right click on an element > Create component or Shift + Ctrl + A
Editing a component:
- Doble click on the component > edit
Unlink components:
- Right click on the component > Unlink Instances > changes only apply on that component
Setting up the Style Guide
Pages > Select the Style Guide
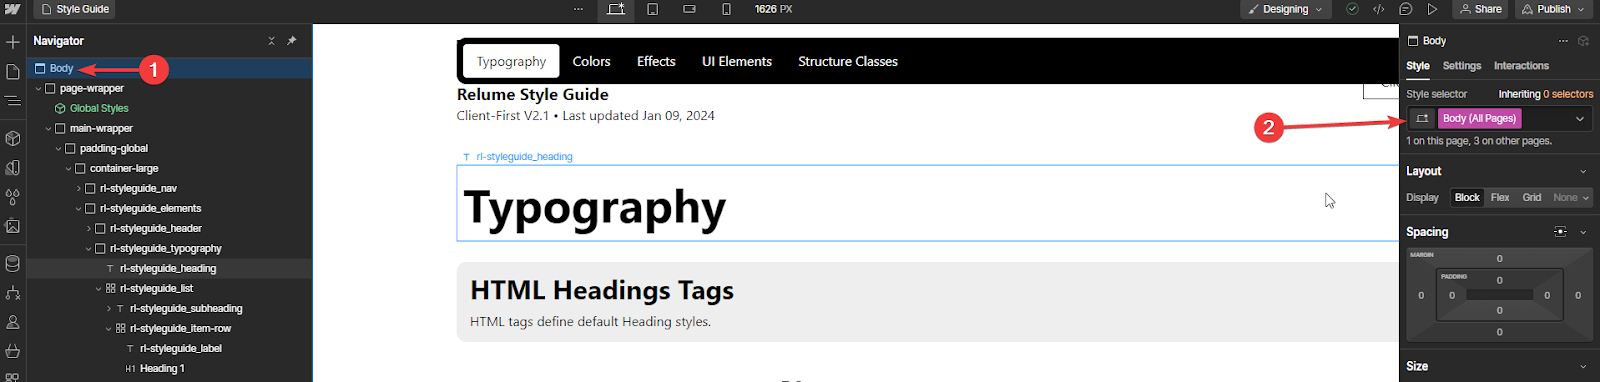
Typography
- While selecting the body select Body (All Pages) class
- Go to Typography > fonts > "Add font"
- Choose a font from the list. Example: K2D
- Select 100, 300, Regular, Italic, 500, 700 > click on "add font"
- Go back to the designer
- Search for K2D font in the Typography font panel and click on it

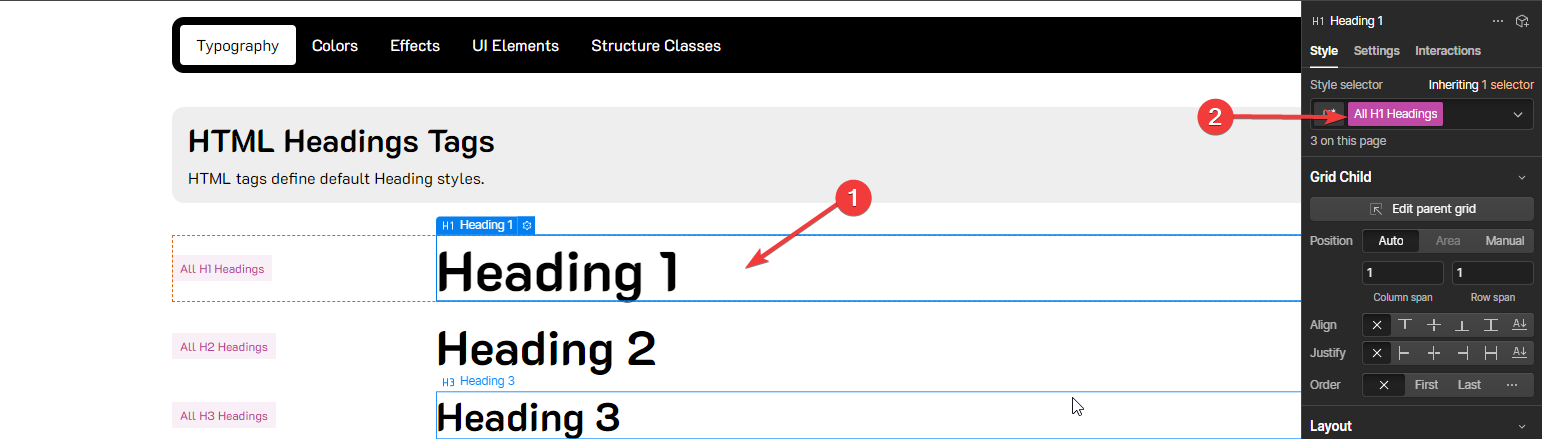
HTML Headings tags:
1.While selecting H1 heading > style selector > “All H1 Headings”
2.Change size, weight , font if needed
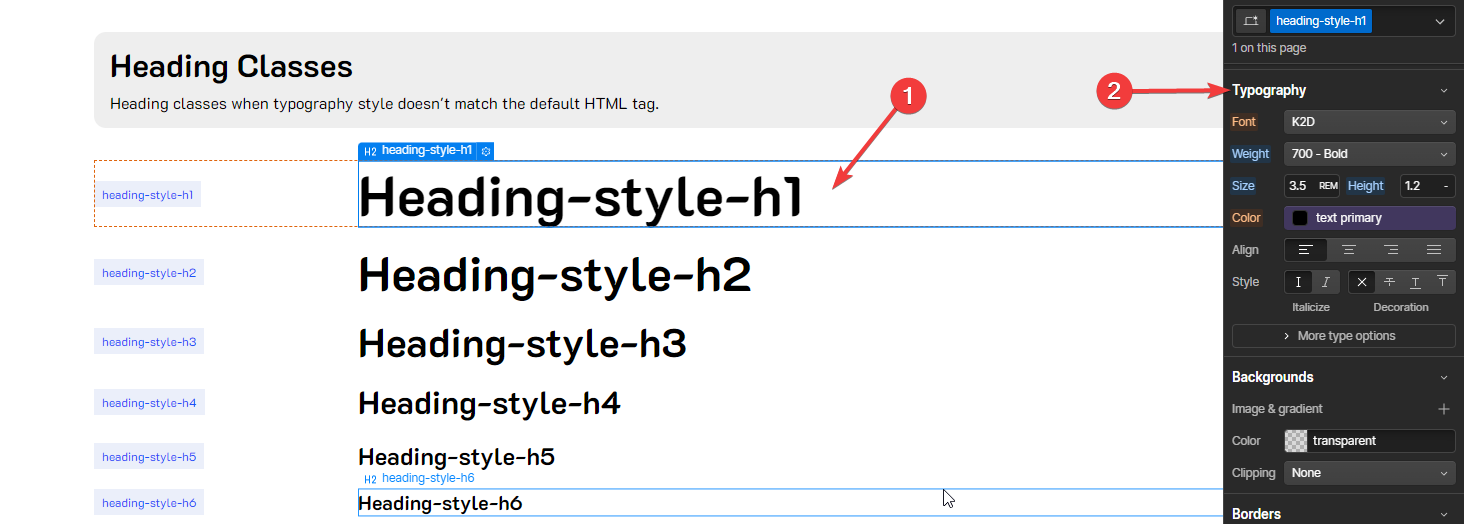
Heading Classes:
1.While selecting heading-style-h1 > change the typography
2. Repeat with H2, H3, H4, H5, H6
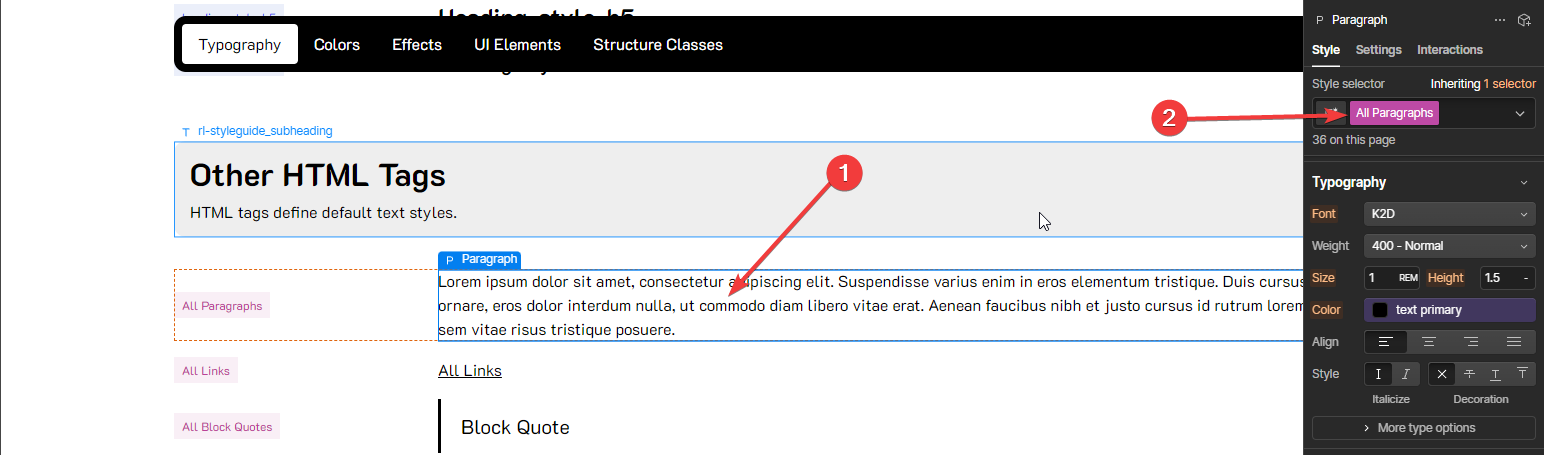
Other HTML Tags:
1.While selecting “All paragraphs” > style selector > “All paragraphs” > edit
2.Same thing to All Links, All Block Quotes, etc
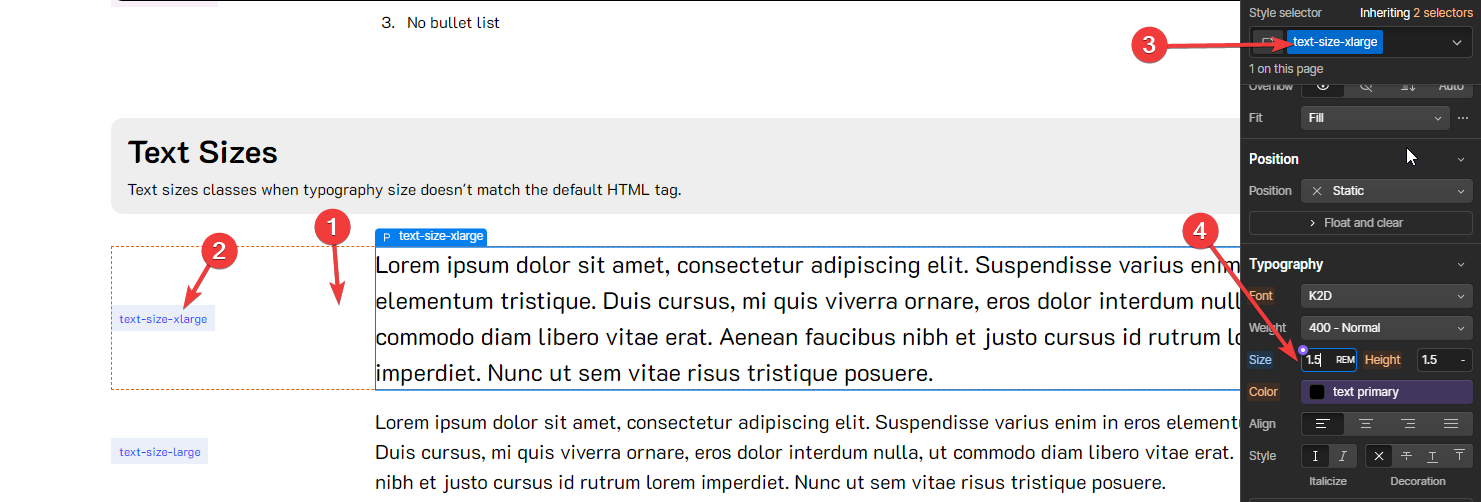
Text Sizes:
1.While selecting text-size-medium > change the font size and Height to any number in REM
2.To create a new text size:
- Copy and Paste an existing text size row > change the label to “text-size-xlarge” for example > style selector should be the same as the label > change the size in typography
Colors:
Creating a color variable:
- Select variables in the left panel
- Click on New Variable > Color > Name your color > choose your color > HEX code
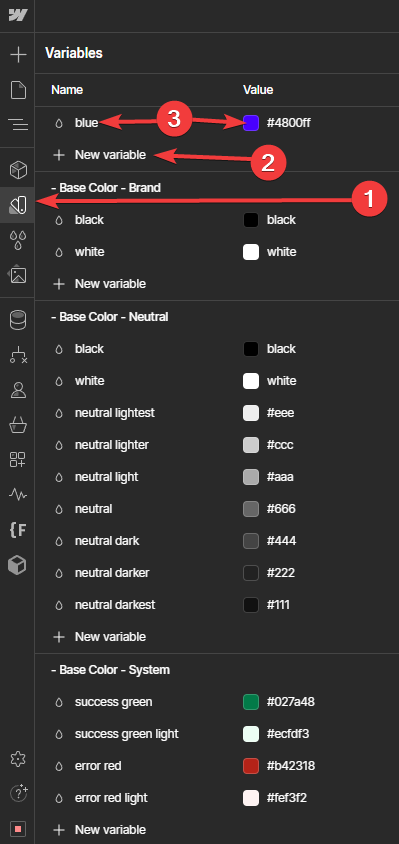
Note: You can create other variables such as size (border radius for example) and font family
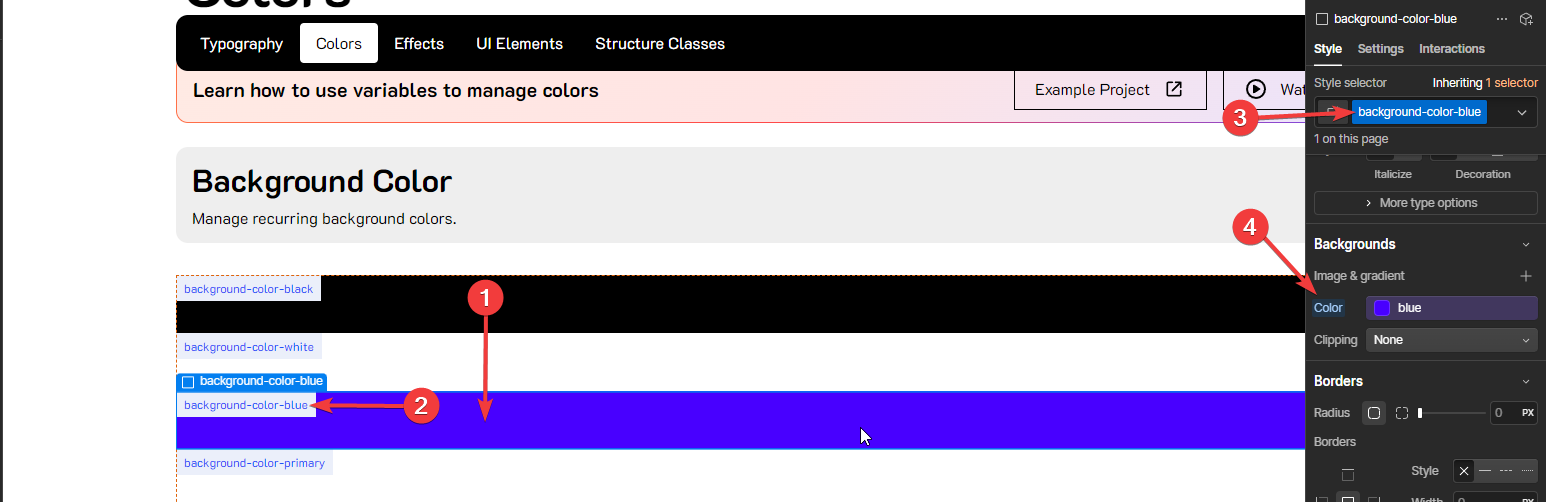
Color Background:
- Copy and paste the background-color-white row > To that copy, change the label to your created color
- Duplicate the class in the style selector > write the same as your label
- On the style panel go to backgrounds > color > select your variable color
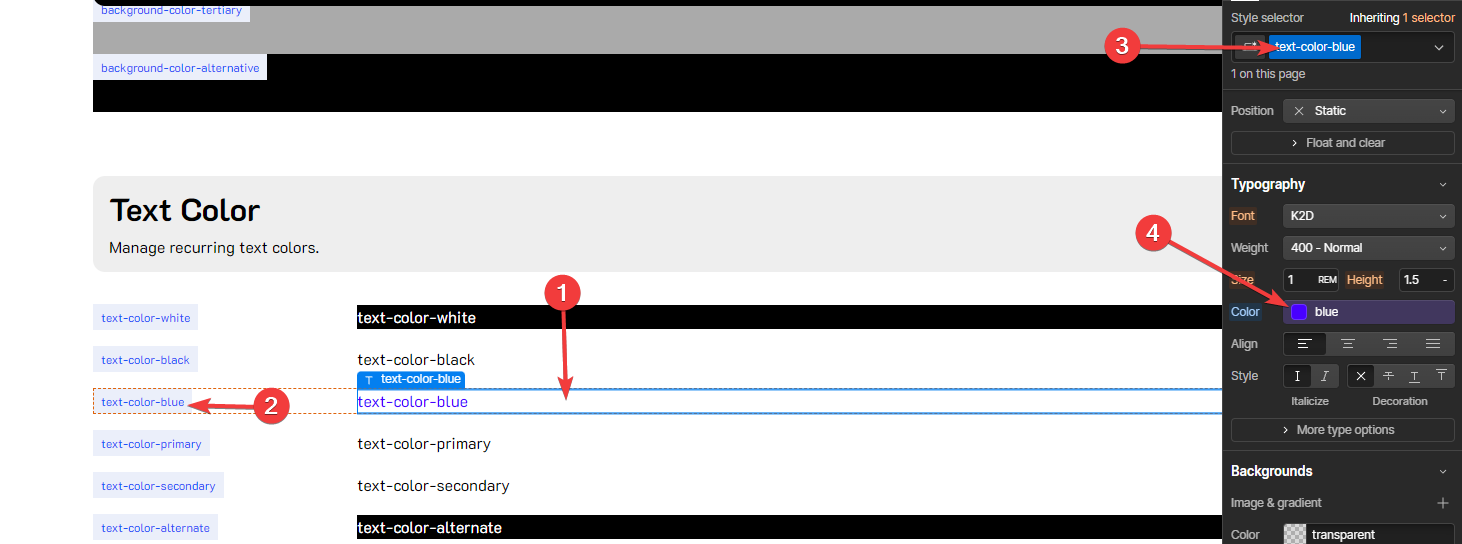
Text Color:
- Copy and paste the text-color-black row > To that copy, change the label to your created color
- Duplicate the class in the style selector > write the same as your label
- On the style panel go to typography > color > select your variable color
Effects:
- While selecting a shadow box go to effects on the style panel > box shadows >click on the effect > change outside or inside x, y, blur, size and color
Creating a new box shadow:
- Copy and paste an existing box shadow > To that copy, change the label to your new box shadow name
- Duplicate the class and write the same as your label
- On the style panel go to effects > box shadows > edit it
UI Elements:
- Style your buttons:some text
- Borders
- Spacing
- Size
- Effects
- Background
Note: Your button class will be used several times along the site. For more customizable buttons use is-secondary or is-tertiary classes

Form Elements:
1. Select form_input > style panel > edit (border radius, etc)
Related Resources
Relume to Figma:
Batch styler (Change multiple text and color styles at once!):
https://www.figma.com/community/plugin/818203235789864127/batch-styler
Color Variables:
https://www.loom.com/share/ecfdef7322364ebf91f4edb994110018
Box Icons:
Kinship Template:
Relume to Webflow:
Client First Docs: https://finsweet.com/client-first/docs
Core Structure: https://finsweet.com/client-first/docs/core-structure-strategy
Custom Code:
https://university.webflow.com/lesson/custom-code-in-the-head-and-body-tags?topics=site-settings
Components:
https://university.webflow.com/lesson/custom-code-in-the-head-and-body-tags?topics=site-settings
https://www.loom.com/share/9c9db8b994684d53981b7ef22efd269f?sid=795349da-80aa-4bd3-b424-ac9e357fa3a9
Custom Fonts:
https://university.webflow.com/lesson/custom-fonts?topics=site-settings
https://www.youtube.com/watch?v=Ndb9wud8Svs&t=12s
Variables:
https://university.webflow.com/lesson/variables?topics=layout-design
https://www.youtube.com/watch?v=GQQo_zcCjdE&t=1s
Variable Fonts:
https://university.webflow.com/lesson/variable-fonts?topics=layout-design
Minifying:
https://university.webflow.com/lesson/advanced-publishing-options?topics=site-settings
Style Guide:
Part 1 (Adding Font to the project) 2min
https://www.loom.com/share/cf8532a6d010485a973e8707e57773e6?sid=577d3ccc-402e-44e2-9f1d-2b8a9dfad319
Part 2 (HTML headings tags and heading classes) 3min
https://www.loom.com/share/a1bcb77f182d4c85bc641fbc347507ea?sid=b6b45e4d-57d8-4196-84a2-a4ae7ef69166
Part 3 (Text size) 1min
https://www.loom.com/share/acc9ea013d094e6babf298ae026ea8dc?sid=b506b1cc-19c7-423c-9c42-67014a28f7fa
Part 4 ( Variables Colors) 4min
https://www.loom.com/share/5139d310d0b946d880d5df7e9397084d?sid=d8c0ed58-b476-4fe6-93ba-e89ad43f7906
Part 5 (Box Shadow, Buttons and Size Variables) 6min
https://www.loom.com/share/58cb18c216d749d8a003d8ecf0316957?sid=12705438-dbc0-4c08-89ee-5167232ec1ff